Showing posts with label PAINT. Show all posts

Ikea Latt Makeover

Wednesday, November 2, 2011

We got this little table and chairs set for Gavin about 15 months ago from ikea.

The whole set is $25, which is an awesome price. But it has taken a bit of a beating. I had to take it apart to re-glue a section that was pulling apart because Gavin drags the table around. So I decided to give it a nice new coat of paint too!


I painted the seats before the table top which worked out really well because the stripes are a little too crazy for such a big area. I think they are cute on the seats though.


The stripes on the chair also worked out really well because one has some damage on the set. It was kind of cracked/creased, so a little sanding and a busy paint job did wonders for it.


What do you think? A good improvement?


Easel Makeover Complete!

Monday, October 17, 2011

Remember when I showed you the easel I brought home from the thrift store the other week? I finished it yesterday!

I'm not the best at spray painting so it took a little longer than planned, but that's ok. I used spray primer then spray paint on it, so in the end the total cost of the easel was about $18. That also includes chalkboard spray paint to redo the chalkboard... it needed it. The original one sells for $25 or so at ikea and I like the colour of this one better, so that is pretty awesome. Gavin actually picked the satin grey paint, and it was an awesome choice (who would expect a 2 year old boy to pick grey?).


I also bought a large chip clip from Walmart for $2 so we can clip paper on for even more artistic options!


Thrift: Owls

Thursday, September 22, 2011

On a visit to the thrift store the other day I found these two owl ornaments. They were the most hideous brown with orange rhinestones sloppily glued in the centre of their eyes (one was missing on the small owl), but they had potential. I had seen this post on Ohdeedoh and have been inspired by all the spray painting vintage items that I've seen on other blogs over the past few months so I decided these would be good to experiment with. If I failed miserably, it would only be a couple bucks lost.


The painting went really well, but you could see the glue remnants in the eyes still, so I used my silhouette to cut some vinyl for the eyes. I stuck those on and gave them a couple more coats of paint. I really liked how they turned out!


They found a nice little home on this weird tree shelf Mason bought me a year ago! Now I just need something to go on top...


Reruns: Stepping Out of My Element

Friday, August 26, 2011


This post was originally posted a little over a year ago when we first moved into our current apartment.


In the process of moving I discovered something that I had forgotten all about. It was an unused canvas that I hid in the back of my son's closet for the first year in Lethbridge. When we moved to the new place, there was tons of wall space to be filled so I decided to paint! I haven't done much, or maybe even any, painting in a couple of years. Before that, I always enjoyed the process, but the end result was never what I envisioned. This time, I decided to keep it simple. I had been inspired by some homemade wall art I'd seen recently on blogs (here [scroll down, it's dandelions in red and white] and here). Mine is obviously different, but the basic, bold colours and simple images are what they have in common.

When I have a project that I want to complete, I don't have the patience to wait until later if I need help with some aspects of it. So for this, I rigged up a ridiculous little "contraption" so that I could project the image of cutlery onto my canvas. What I did was tape the cutlery to the back of a chair, and then stack a bunch of random objects on the seat to boost a flashlight up to the right height. The flashlight projected the shadow of the cutlery on to the canvas. It worked great in the end! I used white chalk to trace the shadow onto the canvas because it wouldn't leave behind problems like pencil sometimes does.


 For the painting, I obviously had made the whole canvas blue first. Then I painted the cutlery white so that the green would cover better!


Here it is in its new home in the dining room!


Glider Makeover... Complete!

Wednesday, May 18, 2011

I'm so excited to show this project off!

I finished up the glider that I have been working on for a long time.... and it is awesome! It looks a million times better and is more comfy. It was a total win-win!  :)

{A big thanks to Mason for his help with sanding the chair down, because it's time consuming and the least fun part of the whole job!}

So in case you missed the other posts about it, here is a photo I found on the web of the chair as we bought it (the wood looked a little more red though):


And here is the finished product:


I also lucked out and found some buttons made to be covered in fabric in the stash of vintage goodies that I got from my grandma a few months back. So I covered them in the same fabric and used them on the back cushion of the chair!


What do you think?

Final Art Project

Friday, December 10, 2010

Good Morning!

Sorry I'm skipping Food Friday this week, I just finished up my final art project for my Native Art Studio class and I really wanted to share it. Our final assignment was to find a piece of art by a contemporary First Nations, Metis, or Inuit artist and create our own piece of art inspired by/interpreted from the original piece. I was totally stumped a few days before it was due, so I asked my sister, Tara, for some help because she is endlessly creative. She gave me two suggestions, I fell in love with the first one right away. This is the original piece I based my project on:


This is the write up on the artist, Leah Dorion's website:

Seven Generations, 2007
This painting shares the First Nation concept of the seventh generation principle which encourages us to make decisions that consider the effects upon seven generations.  This principle causes one to deeply consider the consequence of our actions for the future generations.  In today’s world this type of thinking is necessary if we are to pass on a healthy and sustainable earth system to our grandchildren.

Tara suggested recreating part or all of this piece using garbage/scrap material and that's exactly what I did. So thank you, Tara, for the awesome suggestion! Also thank you to Mason who helped me come up with items for and glue on some of the rows of colour. 


And, in case you're interested, here's all the stuff I used (from the top):

Top blue corners: blue jello powder (Mason's idea and creation)
Pink: little roles of scrap cardstock (Mason's idea and creation)
White: toilet paper with light blue paint dabbed on top
Orange: felt scraps
Dark Red: strips on an old t-shirt
Blue: fabric scraps
Next Blue: felt scraps
Red: pieces of coke cans, pieces of coke bottle labels, pieces of paper from magazine ads
Orange: pieces of text from magazines, painted orange
Pink: scraps of pink cardstock
Yellow: paint
Medicine wheel: toilet paper, felt scraps, magazine ad pieces, coffee grounds
Purple Lady: fabric from old clothes, felt, fabric paint, 
All Hair: black felt scraps
Blue Girls: fabric scraps & paper from magazine ads
Orange Girls: felt scraps, embroidery thread
Ground: pieces of the school newspaper, painted orange, dark spots are used coffee grounds
Turtles: pieces of yogurt containers
Swirls: pieces of magazine ads
Black dots (going up the centre): pieces of a cereal box, painted black
White Squiggly Lines (between colour rows): strips of an old t-shirt
All other details are painted.

And even though I don't use it very often, I really love the fact that I have this amazing easel to use for projects like this. It's very special to me because my dad made it for me!


Some More Art

Thursday, November 25, 2010


Good Morning!

Here's an art project I completed for my Native Art Studio a couple weeks ago. The assignment was to create a self portrait about how we related to the First Nations, Metis, Inuit, Canadian landscape. (Don't worry, we were all as confused as you are when you hear that sentence) I'm pretty happy with it. I used a cereal box as the base/back and then I made the desk, chair, person, and puzzle medicine wheel from air dry clay. I covered the desk in contact paper and painted the rest. I made a book from craft foam and paper.

Do you understand what I'm saying with it?


Shelf Makeover, Part 2

Tuesday, August 10, 2010

Good morning!

Well here is the second part of the shelf makeovers that I owe you. This one isn't nearly as interesting. It was black to begin with, but with some red. Now it is straight black. I have been ignoring its existence for a couple days because I was so angry after hanging it up. It took forever, I screwed up over and over and finally just did a bad job of it. So I don't think I'll be able to put anything that is even slightly heavy on it, but that's fine. It will still serve some purpose! :)

Before:

After:


Shelf Makeover Part 1

Monday, August 2, 2010

Good evening!
I have to tell you, once I got my painting up in the dining room Mason said, "Nice, but there is something missing". I was about to kick his butt for insulting my painting, but he kindly informed me that he was referring to the room in general, not my painting. :)

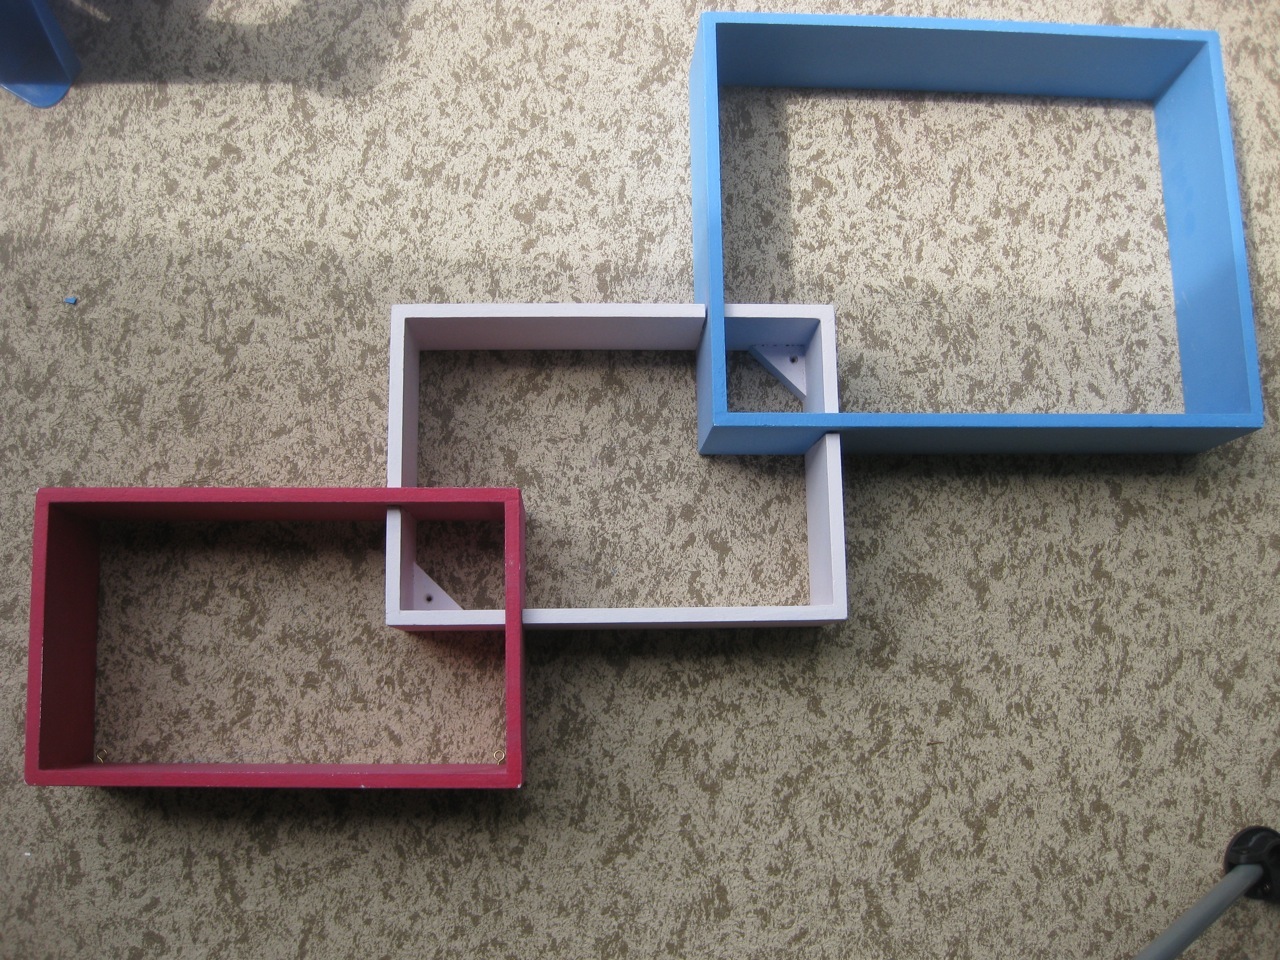
So, I had this old shelf that my dad made for me when I was a teenager. He helped me come up with a fun design for painting my room, and did all the hard labour. We had a very light purple for the wall colour, with big, overlapping squares in different sizes. There was one set of them in the middle of one wall, and another set of them in the corner where two other walls met. Hard to understand, I'm sure. Anyways, to match with the theme he made these rectangular shelves that connect. He painted them the same colours as the walls.

Pink, purple and blue don't really match this place or my current tastes so I decided to repaint the shelves. I sanded them down and spray painted them black (my first experience doing something like this with spray paint). The paint job is not perfect, but that is why I used black. :) I think they fill the empty wall nicely and take the focus off of the big ugly phone jack in the middle of the wall! It took some thinking to decide what to put on the shelves, but in the end it was a nice place to display some of my really nice glasses that I never use.

[My apologies for the picture quality on the "After" shot. The dining room (especially this spot) doesn't get much natural light, which makes nice photos difficult.]
Anyways, I repainted another shelf as well. I'll post part two about it when it's all finished up!

PS- I shared this project here:

Pic+for+Body+of+Blog3.jpg

Stepping Out of My Element

Saturday, July 31, 2010

Good morning!

In the process of moving I discovered something that I had forgotten all about. It was an unused canvas that I hid in the back of my son's closet for the first year in Lethbridge. When we moved to the new place, there was tons of wall space to be filled so I decided to paint! I haven't done much, or maybe even any, painting in a couple of years. Before that, I always enjoyed the process, but the end result was never what I envisioned. This time, I decided to keep it simple. I had been inspired by some homemade wall art I'd seen recently on blogs (here [scroll down, it's dandelions in red and white] and here). Mine is obviously different, but the basic, bold colours and simple images are what they have in common.

When I have a project that I want to complete, I don't have the patience to wait until later if I need help with some aspects of it. So for this, I rigged up a ridiculous little "contraption" so that I could project the image of cutlery onto my canvas. What I did was tape the cutlery to the back of a chair, and then stack a bunch of random objects on the seat to boost a flashlight up to the right height. The flashlight projected the shadow of the cutlery on to the canvas. It worked great in the end! I used white chalk to trace the shadow onto the canvas because it wouldn't leave behind problems like pencil sometimes does.


 For the painting, I obviously had made the whole canvas blue first. Then I painted the cutlery white so that the green would cover better!


Here it is in its new home in the dining room!